Hello all Crafty friends!!!
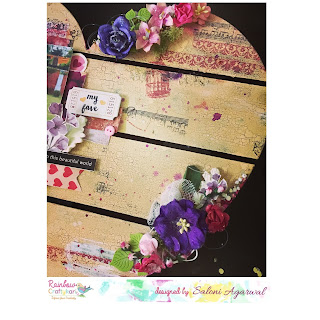
My brother always tell me that " I am a big hoarder" and sometimes I do agree with him. So this time I have created a mixed media layout with a picture , I have been hoarding for a long time. Making a mixed project is also so fun. You can add so many techniques and style and the end results are always a surprise.
I am here today with my first " Picture tutorial post "at Rainbow Craftykari as a DT member....
Step 3: Now I have done stamping to create the backdrop. I have clear stamp and distress ink for the stamping
Step 4: I have used modelling paste to create some texture .I have added little color to the right hand side and let the color do the magic. This is how it looked after it is done.
Step 6: Once you are happy with the arrangement and placement of the layers, embellish the layout with the buttons, flowers , tags and stones.
Hope you all like it and get inspired with it to create something equally beautiful for yourself!!!
Supplies used:
MDF Base
Balck Gesso
Crackle Medium
Chalk paint
modelling paste
Pattern papers
Flowers
color spary
Tags
Most of the above listed materials are available on the Rainbow Craftykari Store and can also be pre-ordered by sending an email at rainbowcraftykari@gmail.com
Do Visit the Rainbow Craftykari store....
Happy Crafting
Saloni
My brother always tell me that " I am a big hoarder" and sometimes I do agree with him. So this time I have created a mixed media layout with a picture , I have been hoarding for a long time. Making a mixed project is also so fun. You can add so many techniques and style and the end results are always a surprise.
I am here today with my first " Picture tutorial post "at Rainbow Craftykari as a DT member....
So here is how I made the layout:-
Enjoy the video flip through and the step by step instruction below...
Enjoy the video flip through and the step by step instruction below...
Step 1: For this beautiful layout, I have taken a MDF base measuring 12x12 inches. I have applied a coat of black gesso and let it to dry. I wanted to give it a bit of edgy look, so I applied crackle medium evenly with a brush and left it to get dry. The crackle medium should be dried completely before applying the second layer of color.
Step 2: Once the base was completely dried , I applied second layer of color. When applying the crackle medium , you should always use dark color as base so that once you apply second layer of color, the darker color can be easily visible.
Step 3: Now I have done stamping to create the backdrop. I have clear stamp and distress ink for the stamping
Step 4: I have used modelling paste to create some texture .I have added little color to the right hand side and let the color do the magic. This is how it looked after it is done.
Step 5: Select the photo of your choice that you wish to make the focal point of your project. I have used a picture which is very close to my heart. Do not paste the picture now . we will create a layered base and paste it later on . Fussy cut few images . Distress the edges with distress ink. I have randomly put the images just to see the final outcome.
Hope you all like it and get inspired with it to create something equally beautiful for yourself!!!
Supplies used:
MDF Base
Balck Gesso
Crackle Medium
Chalk paint
modelling paste
Pattern papers
Flowers
color spary
Tags
Most of the above listed materials are available on the Rainbow Craftykari Store and can also be pre-ordered by sending an email at rainbowcraftykari@gmail.com
Do Visit the Rainbow Craftykari store....
Happy Crafting
Saloni


